Hi friends! It’s Dori, and I’m back this week to share my recipe for croissants.
I have a complicated relationship with croissants. On one hand, I love them. I think they are the highest form of bread. I would rather have a bad croissant than a great baguette. They make every breakfast better. They make every sandwich better. They make everything better!
On the other hand, I hate them so so so much. I make croissants for kat&dori customers all the time and usually end up injured. I’ve ended up with bruises on my hands, tennis elbow, and tendinitis.
So… yeah… I should warn you: this recipe isn’t for the faint of heart. Making croissants at home is physically demanding and time consuming (professional bakers have fancy equipment to make the process easier). There are a million things that can go wrong and even when things are going right, you’ll be sure they’re going wrong. It will take three days. Your arms will hurt. You will hate me. You’ll hate the recipe. You’ll hate France.
But holy rusted metal, you guys. This recipe is worth it.Upper body strength is a huge help. Also a huge help: having a brother to do it for you while you point and give vague directions.
They are nothing like the croissants you get at a certain big box store. These are a whole different thing.
Three days of hard labor gets you perfect croissants with flaky middles and crisp edges. They are light, but substantial. They are buttery, but not oily. They are perfect. There is absolutely nothing that can compare to fresh croissants. This recipe converted my croissant-hating brother into a croissant junkie.
For this recipe, you’ll have to make a laminated dough. I don’t think we’ve talked about laminated doughs before, but I can explain the concept really simply: the goal of making a laminated dough is to have alternating layers of cold butter and dough. To achieve that, we’ll make a butter square and use a series of folds and turns to form more and more thing layers. (Click here if you want to read Adam's complicated and really not important explanation of why it's called laminated dough.)
|
We got the phrase “laminated dough” from the French, who borrowed it from Latin. In Latin, laminae were thin layers; the segmented metal armor of the rank-and-file Roman soldier would’ve been called something like lorica laminata, meaning armor made from the aforementioned thin layers.
At some point between the 1600s and the 1900s, to laminate something actually meant to flatten or slice something into narrow layers. It’s in that sense that we adopted the term laminated dough: ever-thinning layers of a water-based dough (the détrempe, meaning something like ‘water-logged’) and the block of butter (the beurrage, meaning something sort of like ‘butter plate’). So we “laminate” the dough not because we’re covering it in something, as such, but because we’re constantly thinning its constituent parts. Sort of like making lorica laminata for the Pillsbury Dough Boy. |
The key to this recipe, and laminated dough in general, is keeping the butter cold. If the dough melts, your croissants will be bread-like, and not in a good way. Like in a heavy dry biscuit way.
The biggest battle in keeping the butter cold is the temperature of your kitchen. Kitchens tend to be hot, so do what you can to lower the temp. Don’t run the oven or the dishwasher while working with the dough. Turn up the air. Get a fan. Watch Frozen while you roll out the dough and think cold thoughts. Small changes can make a huge difference.
Those changes may not be enough, and that’s okay. It just depends on your kitchen. If they aren’t, get a pan with high sides and fill it with ice. If you notice the butter is getting soft, place the pan on top of parchment-covered dough and take a break (believe me, your arms will need it anyway). The butter should start behaving in 10-15 minutes. Or stick the dough in the freezer — where you are in the process will determine what’s easier.
But prepare yourself for a workout: the colder the butter is, the harder it’s going to be to roll out this dough. And it’s going to be hard. Upper body strength is a huge help. Also a huge help: having a brother to do it for you while you point and give vague directions (“uh, kind of flatter. And more rectangle-y. Yeah.”).
If you are brotherless, I suggest finding a surface that is lower than a traditional counter to roll out the dough so that you can use your body weight to add pressure. Before I found a lower work surface, I rolled out dough while standing on a step stool or wearing super high heels. (Now that I’ve typed that, I see that it’s weird.) [Just to be clear, I wore slippers, which had no heel of any kind. — Adam]
Don’t get hung up on the measurements. They’re a guide, not a rule. (But the cold butter thing is a rule. Get hung up on that.)
We filled some croissants with chocolate, others with prosciutto and Gruyere. You can fill them when anything you can think of (I’ve heard that Nutella is popular with folks that don’t die from hazelnuts), but be careful not to overfill them.
I also used some of the dough to recreate a pastry I had in Iceland. It’s croissant dough that’s filled with pastry cream and topped with chocolate glaze. I don’t know why more people aren’t making it here!
Friends that went to Iceland: brunch soon? [Cool people who didn’t go to Iceland because that’s a lot of money we could be spending on food and liquor: scotch soon? — Adam]
|
| |||
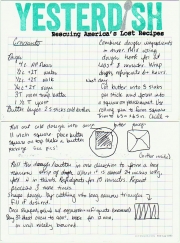
From Yesterdish’s recipe box.
Yesterdish’s Croissants
Dough:
4 c. all-purpose flour
1/2 c. + 2 Tbsp. water
1/2 c. + 2 Tbsp. milk
1/4 c. + 2 Tbsp. sugar
3 Tbsp. room temperature butter
1-1/2 Tbsp. yeast
Butter layer: 2.5 sticks cold butter.
Combine dough ingredients in mixer. Mix using dough hook for at least 8 minutes. Wrap dough; refrigerate 6+ hours.
Next day:
Cut butter into 3 slabs per stick and form into a square on parchment. Use rolling pin to form square. Trim to 6.5 inches by 6.5 inches. Chill.
Roll out dough into 11-inch square. Place butter square on top. Make a butter package. See pics! [Refer to diagram on card; in short, fold the points of the dough square inward to touch each other, enveloping the butter.]
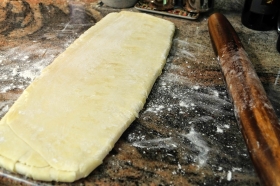
Roll the dough/butter in one direction to form a long, narrow strip of dough. When it is about 24 inches long, fold it in thirds. Refrigerate for 15 minutes.
Repeat process 3 more times.
Shape dough by cutting into long narrow triangles. [See card for diagram.] Fill if desired.
Once shaped, paint with egg wash; refrigerate (uncovered).
Day 3!
Heat oven to 400 deg. Bake for 12 minutes or until nicely browned.


Do you use salted or unsalted butter??
I always use salted, but either will work! (Salted butter stays fresher longer and I don’t think it changes the taste)